- Thread Author
- #1
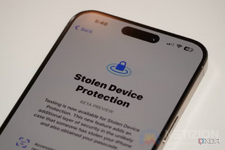
No one ever wants to think about their iPhone getting lost or stolen, but the reality is that it can happen. In the event of this unfortunate situation, there are things you can do to protect your personal information and prevent a thief from using the device. One of the most useful is Stolen Device Protection.
What is Stolen Device Protection?
Stolen Device Protection is available to any iOS device running iOS 17.3 or later. This includes iPhone X models and above and iPhone SE second and third-gen models and above. Once enabled, additional actions are required to access certain parts of the device when it’s not in one of your familiar locations, like at home or the office. So, even if a thief or nosy individual happens to know your passcode, they still won’t be able to make changes to your account or access your personal information without your facial ID or fingerprint.Once Stolen Device Protection is on, Face ID or Touch ID biometric authentication will be required to access things like your stored passwords and credit cards, turning off Lost Mode, erasing contents and settings, applying for a new Apple Card, viewing your current Apple Card or Apple Cash virtual card numbers, or using the iPhone to set up a new device. Even with a passcode, no one else can access these crucial features. You can set up Stolen Device Protection to require biometric authentication even when you’re in your familiar locations as well, as an added layer of personal security.
Stolen Device Protection also includes a Security Delay, so security actions like changing the Apple ID password, signing out of your Apple ID, updating Apple ID account security, adding or removing Face ID or Touch ID verif!cati0n, changing the passcode, resetting the device, turning off Find My, and turning off Stolen Device Protection require that you wait for one hour and confirm the requested change with a second Face ID or Touch ID authentication.
This gives you time to mark the device as lost or stolen and keep your Apple account secure before someone nefarious tries to reset it. If the device ends up back at your familiar location (say, you left it at a local coffee shop and returned to retrieve it), the security delay may recognize this and end early.
The important thing to note is that Stolen Device Protection, one of the security features every Apple user should be using, must be turned on before the device is out of your sight and lost or stolen. So, you’ll want to set that up ASAP as a precautionary measure.
How to set up Stolen Device Protection in iOS
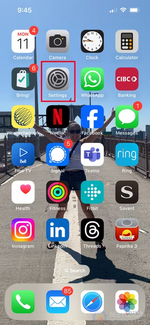
First, make sure that you have two-factor authentication set up for your Apple ID, including a device passcode, Face ID, or Touch ID. Once this is set up, you can proceed to the next step.- Go to Settings.
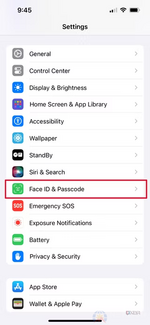
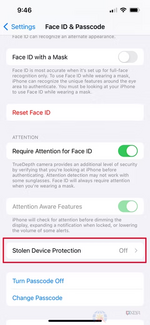
- Scroll down and select Face ID & Passcode.
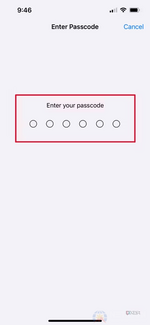
- Enter your device passcode.
- Scroll down and select Stolen Device Protection.
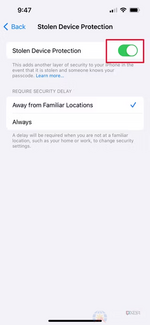
- Tap to the right to turn Stolen Device Protection on. It will turn green to confirm.
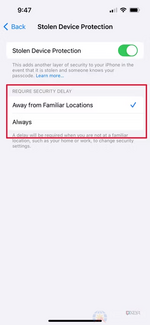
- From here, you can select to keep this feature on only when you’re Away from Familiar Locations or Always. (Note: Location Services needs to be on for this to work).
What else to know about Stolen Device Protection
Keep in mind that you need to set up or turn off Stolen Device Protection from a familiar location; otherwise, a security delay starts. So, if you’re going on vacation and want to turn it off for some reason, make sure to do so before you leave home. You’ll also need to do this before you sell, give away, or trade-in your device.Now comes the important part: finding your lost or stolen iPhone. You can use Find My on a Mac to locate a lost Apple device, including an iPhone. It’s critical to set up Find My on your iPhone as soon as possible, so it’s always locatable.
Whether you have one of the latest iPhones or an older model device, it’s important to keep your precious phone protected and secure. Especially if you use features like Apple Wallet and have sensitive information on the device, you want to be able to mark it as lost or stolen immediately and prevent someone from viewing your personal files and secure information.
Stolen Device Protection is an important part of that setup, and it’s a feature you should always have. Sure, it means an extra step when you want to pay for something from your Apple Wallet, for example, or log in to an account. But it’s worth it for protecting the device and the personal information you have stored on it.
